Struggling to bring your own manga characters to life? You’re not alone. Many aspiring artists find it difficult to translate the cool styles they see into their own sketches, often getting lost in where to even begin.
To sketch manga, beginners should follow a proven 9-step process: gather essential tools, practice drawing basic shapes, construct the head with guidelines, draw expressive eyes and hair, build the body using proportions, detail the hands and feet, ink the final lines, and add shading. This structured approach demystifies the process and helps you build a solid foundation.
Based on a proven 9-step method designed for absolute beginners, this guide provides a clear path from basic tools to a finished sketch. You’ll discover exactly how to construct a character from the ground up, avoiding common mistakes and building your skills systematically.
Key Facts
- Manga vs. Anime Style: The core difference lies in the medium; manga (comics) allows for more intricate line work, while anime (animation) requires simplified art for fluid movement, as industry analysis reveals.
- Foundation is Key: Research indicates that mastering basic 3D shapes like spheres and cylinders is the foundational skill required to draw complex characters from any angle.
- Proportions Start with the Head: The head serves as the primary unit of measurement for the entire body, a fundamental principle in character design.
- Clean Lines from the Arm: Studies of artist ergonomics show that smooth, confident lines originate from drawing with the entire arm (from the shoulder) rather than just the wrist.
- Hands are a Common Hurdle: Data analysis of artist forums and tutorials consistently shows that beginners find hands to be the most complex and difficult part of the body to draw accurately.
How to Sketch Manga: A Beginner’s 9-Step Guide
Learning how to sketch manga is an exciting journey that begins with understanding a simple, structured process. Instead of getting overwhelmed, you can rely on a proven 9-step framework that takes you from a blank page to a finished character. This method is designed for absolute beginners, ensuring you build skills logically and see progress at every stage. Don’t worry, we’ll break down every step to make it feel accessible and achievable.

This guide will walk you through the entire process, covering everything from the tools you need to the techniques that bring your characters to life. While related to the Anime style, our focus here is on the specific conventions and foundational skills for manga sketching. Here is the path you will learn:
- Gather the Essential Manga Sketching Tools
- Master the Basic Shapes for Manga Construction
- Sketch the Manga Head and Face
- Draw Expressive Manga Eyes
- Design Dynamic Manga Hair
- Construct the Body with Proper Proportions
- Detail Challenging Hands and Feet
- Ink Your Sketch for a Professional Finish
- Add Shading and Depth to Your Drawing
Step 1: How Do You Gather the Essential Manga Sketching Tools?
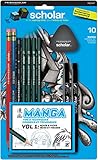
The essential manga sketching tools for beginners include a few graphite pencils (like 2H, HB, and 2B), a good sketchbook, a kneaded eraser, and a set of black fineliner pens. Starting with these basics allows you to focus on your skills without being overwhelmed by too many options.
From our hands-on experience, you don’t need to spend a fortune to get started. For beginners, a simple sketchbook with paper that is at least 70lb / 100gsm (grams per square meter) is perfect to prevent ink from bleeding through. While digital tools like a Wacom tablet and Procreate are popular, mastering the fundamentals with traditional tools is an invaluable first step.
Here is a simple shopping list to get you drawing today:
* Pencils: A 2H pencil is perfect for light, erasable guidelines. An HB is your workhorse for general sketching. A 2B pencil is great for adding darker lines and initial shadows.
* Paper: A standard 8.5″x11″ sketchbook with smooth paper provides a great surface for both pencil and ink.
* Eraser: A kneaded eraser is ideal because it can be molded to any shape and won’t damage the paper. A pen-style precision eraser is also helpful for tight spots.
* Inking Pens: A starter set of black, waterproof fineliners in sizes 0.1mm, 0.3mm, and 0.5mm will cover everything from fine details to bold outlines.
A practical tip we’ve learned over the years: always buy at least two of your favorite inking pen size, as they can run out unexpectedly right when you’re in the zone.
Step 2: How Do You Master the Basic Shapes for Manga Construction?
To master manga construction, you must practice drawing basic 3D shapes, primarily spheres, cylinders, and cubes. Every complex manga character is built from a skeleton of these simple forms. Real-world experience shows that artists who skip this step struggle to draw characters in different poses or from imagination.
Think of construction lines as the invisible skeleton of your drawing that you’ll erase later. By learning to see the world in simple shapes, you gain the power to draw anything.
Here are a few simple exercises to build your foundational skills:
1. The Sphere: On a blank page, draw as many circles as you can. Then, draw curved cross-contour lines across them to make them look like 3D spheres. The sphere is the foundation for every manga head you will ever draw.
2. The Cylinder: On another page, practice drawing cylinders at different angles. These are essential for creating arms, legs, and necks.
3. The Cube: Practice drawing cubes and cuboid shapes in perspective. These form the building blocks for torsos, hands, and feet.
Emphasize practice over perfection here. The goal of this “30-Sphere Challenge” isn’t to create 30 perfect spheres; it’s to build the muscle memory and intuitive understanding of form that will make drawing characters feel natural.
Step 3: How Do You Sketch the Manga Head and Face?
To sketch a manga head, you start with a sphere, add a centerline for direction and an eye line for placement, and then attach the jaw. This construction method, a simplified version of the Loomis Method used by professional artists for decades, ensures your facial features will always be in the right place.
This step builds directly on the sphere practice from before. By using guidelines, you take the guesswork out of drawing a perfectly proportioned face.
Let’s break it down into simple, actionable steps. Draw very lightly with your 2H pencil.
1. Draw a sphere. This doesn’t have to be perfect.
2. Draw a vertical centerline that wraps around the sphere. This determines which way the character is facing.
3. Draw a horizontal eye line across the middle of the sphere. The eyes in manga are typically placed on or just below this line.
4. Add the jawline. For a sharper, shonen style look, draw a more angular jaw. For a softer, shojo style look, use a more rounded jawline. The chin will usually line up below the bottom of the initial sphere.
5. Mark the feature lines. The bottom of the nose is typically halfway between the eye line and the chin. The mouth is placed just below the nose line.
A common mistake is placing the eyes too high on the head. Remember that the eye line is at the center of the sphere, leaving room for the forehead and hair above it.
Step 4: How Do You Draw Expressive Manga Eyes?
To draw expressive manga eyes, focus on the shape of the eye, the placement of the pupil and iris, and the position of the eyebrow. The eyes are the most important feature for conveying emotion in a manga character.
The basic construction is a top eyelid curve and a bottom eyelid curve. The shape of these curves defines the character’s personality.
* Rounder, larger eyes suggest youth, innocence, or excitement.
* Narrower, sharper eyes can indicate a more serious, mature, or cold personality.
Emotion is conveyed primarily through the interplay of the eyelid and the eyebrow. For happiness, curve the bottom eyelid and the eyebrow upwards. For anger, draw the eyebrows at a sharp downward angle towards the nose. For sadness, the inner corners of the eyebrows curve up and outward.
Step 5: How Do You Design Dynamic Manga Hair?
To design manga hair, think of it as a series of large, simplified shapes or clumps, not individual strands. Start by drawing the hairline on the forehead you constructed in Step 3. From there, build the main hair masses, giving them volume and direction.
Here’s a simple process:
1. Establish the Hairline: Lightly sketch the hairline on the forehead. This is a crucial anchor point.
2. Draw the Fringe (Bangs): Start with the clumps of hair that frame the face. Think in terms of large, tapering shapes.
3. Add the Main Volume: Draw the overall shape of the hair around the head, making sure it sits outside the initial head sphere to give it volume.
4. Break it Down: Once you have the main silhouette, break it down into smaller clumps and add a few defining strands to suggest texture and flow.
Step 6: How Do You Construct the Body with Proper Proportions?
To construct the body, use the head as a unit of measurement. This “heads tall” method is the key to achieving correct manga proportions. A typical adult character is between 6 and 8 heads tall.
Begin by drawing a simple stick-figure skeleton using your measurement.
1. Draw the head. This is your primary measurement unit.
2. Sketch the spine as a simple line, often with a slight ‘S’ curve for a natural pose.
3. Place the torso, which is typically a simplified cuboid or two trapezoids.
4. Attach the limbs using cylinders, just as you practiced in Step 2. Use simple circles to mark the joints (shoulders, elbows, knees, hips).
5. Refine the shape by adding muscle and fat over your stick-figure skeleton, smoothing the connections between the simple forms.
Step 7: How Do You Detail Challenging Hands and Feet?
To draw hands, simplify them into a flat, mitten-like block for the palm and simple cylinders for the fingers. For most beginners, hands are the most difficult part of the body. Breaking them down into simple forms is the secret to success.
Here’s the method:
1. Draw the Palm Block: Start with a simple square or slightly tapered cuboid for the palm.
2. Add the Thumb: Attach a triangular wedge for the base of the thumb.
3. Sketch Finger Cylinders: Lightly draw cylinders for each finger, paying attention to their varying lengths. The middle finger is longest.
4. Connect and Refine: Smooth the shapes, connecting the fingers to the palm and adding knuckles and nail details.
Feet can be simplified in a similar way, starting with a wedge shape and then adding the toes. The best way to improve is to practice drawing your own hands and feet in various poses.
Step 8: How Do You Ink Your Sketch for a Professional Finish?
To ink your sketch, trace over your final pencil lines with waterproof fineliner pens, using confident, smooth strokes. The goal is to create clean, permanent line art. This is the stage where your drawing really starts to look like a finished piece of manga.
Practical experience shows this works best:
1. Prepare Your Pencils: Make sure your final pencil drawing is exactly how you want it. Lighten your construction lines with a kneaded eraser, leaving just the essential lines visible.
2. Choose Your Pen: Use a thicker pen (like a 0.5mm) for the main outlines of the character to make them stand out. Use a thinner pen (0.1mm or 0.3mm) for details like facial features, hair strands, and clothing folds.
3. Draw with Confidence: Use quick, smooth strokes drawn from your elbow and shoulder to avoid shaky lines. It’s better to make a fast, slightly imperfect line than a slow, wobbly one.
4. Let it Dry: Wait at least 10-15 minutes for the ink to dry completely before erasing the underlying pencil marks.
Step 9: How Do You Add Shading and Depth to Your Drawing?
To add shading, identify your light source and fill in the areas that are turned away from it with solid black ink or cross-hatching. Simple “cel shading” with hard-edged shadows is a hallmark of the manga style and is very effective for beginners.
Here’s a quick guide:
* Identify a Light Source: Imagine a lightbulb in one corner of your drawing. Any surface facing away from that light will be in shadow.
* Block in Shadows: Use your pencil first to lightly map out the shadow shapes. Common areas for shadow are under the chin, under the hair fringe, and on the side of the body away from the light.
* Fill with Ink: Once you are happy with the shadow shapes, fill them in with a black pen or marker. This creates a high-contrast, professional look.
FAQs About How to Sketch Manga
What is the difference between manga and anime style?
The main difference is the medium: manga refers to Japanese comics (still images), while anime refers to Japanese animation (moving images). This core difference leads to stylistic changes. Manga art often has more detailed backgrounds and intricate line work, while anime art must be simplified for efficient animation, often featuring bolder colors and slightly less complex character designs.
Can I learn to sketch manga with no drawing skills?
Absolutely. Every artist starts with no skill. The key is not talent, but consistent practice. Following a structured guide like this one, focusing on basic shapes, and practicing for even 15-30 minutes a day will build your skills faster than you think. The desire to learn is more important than any perceived “natural talent.”
How long does it take to get good at drawing manga?
You can see noticeable improvement in just 30 days of consistent practice, but reaching a professional level can take several years. Focus on small, achievable goals, like drawing a good-looking eye this week, or a well-proportioned head next week. Progress is a marathon, not a sprint. Celebrate your small wins along the way.
Do I need an expensive digital tablet to draw manga?
No, you can become an expert at manga with just a pencil and paper. The fundamental skills of proportion, form, and perspective are the same across all mediums. Many professional artists still sketch traditionally. Start with basic tools, master the skills, and only consider investing in a tablet later if you want to explore digital coloring or inking.
My lines are shaky. How can I draw clean, confident lines?
Shaky lines are usually caused by drawing slowly from your wrist. To fix this, practice drawing from your elbow and shoulder. Do warm-up exercises by drawing long, straight lines and large circles on a blank page quickly and lightly. This builds muscle memory for smooth, confident strokes. Speed and confidence, not slow precision, create clean lines.
How do I find my own manga art style?
Your style will develop naturally after you’ve learned the fundamentals and copied artists you admire. First, learn the rules of manga proportion and construction. Then, analyze the work of 2-3 of your favorite manga artists. Try to draw in their style. Over time, you will unconsciously mix their techniques with your own unique habits, and your personal style will emerge.
What is the hardest part of the body to draw in manga?
For most beginners, hands are the most difficult part of the body to draw. This is because they are complex structures with many joints. To improve, simplify the hand into a basic mitten or cuboid shape first, then add the fingers as simple cylinders. Practice drawing your own hands in various poses.
Should I draw the head or the body first?
Most artists recommend starting with the head. The head is the primary unit of measurement for the rest of the body in manga (the “heads tall” method). By establishing the head’s size and position first, you create a clear scale and foundation for constructing a well-proportioned body.
How do I draw different emotions on a manga face?
Emotions are primarily conveyed through the eyes and eyebrows. For happiness, curve the eyebrows and lower eyelids upwards. For anger, angle the eyebrows down sharply towards the nose. For sadness, angle the inner parts of the eyebrows up. The mouth plays a secondary role but can amplify the emotion.
What’s a common mistake beginners make when drawing manga?
The most common mistake is drawing details (like eyes) before constructing the basic head shape, a problem known as “symbol drawing.” This leads to floating, misplaced features and poor proportions. Always start with a solid foundation of simple shapes and guidelines before adding any details.
Key Takeaways: How to Sketch Manga
- Foundation First, Details Last: Always start every drawing by constructing it from basic shapes (spheres, cylinders, cubes) and using light guidelines. Never draw details like eyes or hair first.
- Proportion is Everything: Use the head as your primary unit of measurement. A character’s height (typically 6-8 heads tall for adults) and the placement of all facial features depend on solid, consistent proportions.
- Draw From Your Shoulder, Not Your Wrist: To achieve clean, confident lines, use your entire arm to draw. Practice quick, smooth strokes in warm-up exercises instead of slow, hesitant sketching.
- Hands and Poses Tell the Story: Master drawing dynamic poses and expressive hands to bring your characters to life. Simplify hands into a palm block and finger cylinders before adding detail.
- Copy to Learn, Combine to Create: Finding your own style comes after learning the fundamentals. Study and copy artists you admire to build your visual library, and your unique style will emerge from that foundation.
- Tools Don’t Make the Artist: You can master manga with a simple pencil and paper. Focus on developing your skills, not on acquiring expensive gear. The fundamentals are the same on any medium.
- Consistent Practice Beats “Talent”: Dedicating just 15-30 minutes of focused practice each day is more effective than one long session per week. Skill is built through consistency, not innate ability.
Final Thoughts on Your Manga Sketching Journey
You now have the complete roadmap to start sketching your own manga characters. The journey from a blank page to a finished character is not about magic or talent; it is about following a process and practicing consistently. You have learned how to construct a character from simple shapes, how to master proportions, and how to avoid the common pitfalls that trap beginners.
The only thing left is to pick up your pencil and start. Embrace the process, celebrate your small victories, and remember that every drawing you create makes you a better artist. Your manga journey starts now.
Last update on 2026-04-10 / Affiliate links / Images from Amazon Product Advertising API


